前言:上篇介绍了下 MVC5 的核心原理,整篇文章比较偏理论,所以相对比较枯燥。今天就来根据上篇的理论一步一步进行实践,通过自己写的一个简易MVC框架逐步理解,相信通过这一篇的实践,你会对MVC有一个更加清晰的认识。
本文原创地址:
MVC源码学习系列文章目录:
这篇博主打算从零开始一步一步来加上MVC里面用到的一些技术,整篇通过三个版本,逐步完善。
一、版本一:搭建环境,实现MVC请求通过上篇的介绍,我们知道,MVC里面两个最核心的部件:MvcHandler和UrlRoutingModule。现在我们就来一步一步实现它们。为了更加真实,我们完全从零开始。
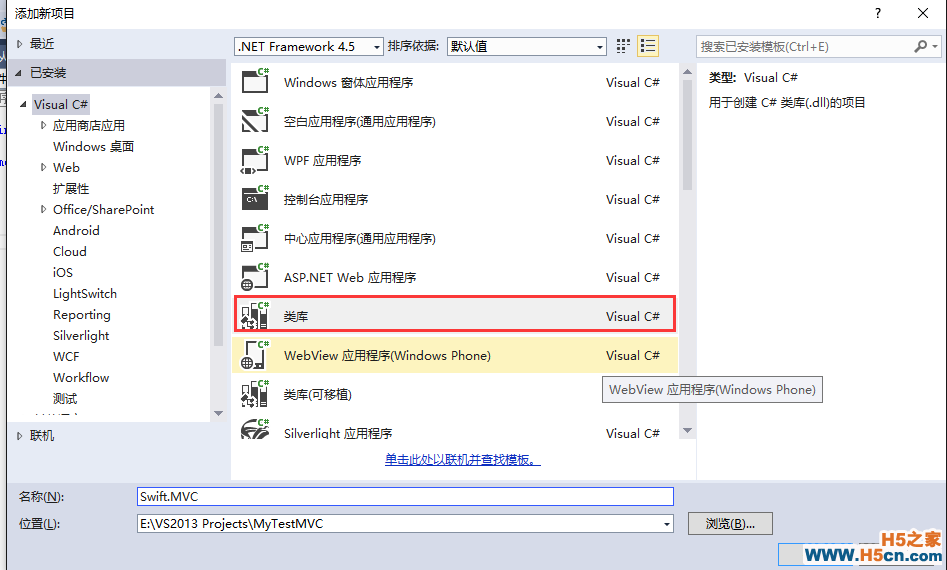
1、新建一个类库项目,我们暂且命名为Swift.MVC.
我们新建两个文件,然后实现IHttpHandler和IHttpModule。我们知道这两个接口都在System.Web里面,首先我们在类库项目里面引用Syste.Web这个dll,然后来看具体的代码。
MvcHandler.cs代码:
namespace Swift.MVC { public class MvcHandler : IHttpHandler { public bool IsReusable { get { return false; } } public void ProcessRequest(HttpContext context) { context.Response.Write(+ context.Request.Url.AbsoluteUri + " "); context.Response.Write(); } } }
UrlRoutingModule.cs代码:
namespace Swift.MVC { public class UrlRoutingModule : IHttpModule { public void Dispose() { //throw new NotImplementedException(); } public void Init(HttpApplication app) { app.PostResolveRequestCache += app_PostResolveRequestCache; } void app_PostResolveRequestCache(object sender, EventArgs e) { var app = (HttpApplication)sender; app.Context.RemapHandler(new MvcHandler()); } } }
如果你看过博主的上篇,这个应该很好理解。UrlRoutingModule注册PostResolveRequestCache事件,通过这个事件拦截当前的请求,拦截到请求之后,再交由MvcHandler去处理当前的http请求。整个过程就是这么简单,我们最最基础的“框架”就搭好了。
3、新建一个空的Web项目测试Swift.MVC第一步,新建一个空的Web项目,添加对Swift.MVC的引用,或者直接将Swift.MVC.dll拷贝到web项目的bin目录下面,两种方式都行,这里为了方便测试,我们直接添加解决方案中的项目引用。
第二步,配置Web项目的web.config文件。上篇我们就介绍过,HttpHandler和HttpModule的实现类要生效,就必须要在Web.config里面注册。注册之后整个Web.config的内容如下:
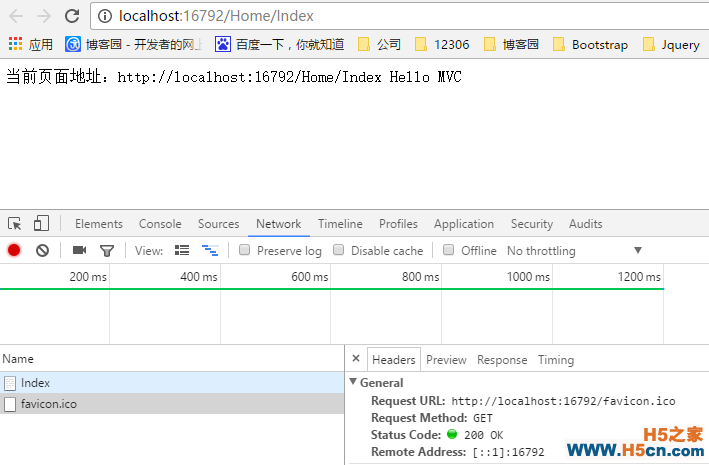
得到结果

这里博主想要说明两点:

这里通过以上实现和配置,我们的Swift.MVC已经具有处理http请求的能力,但还不能算一个完整意义上的框架,下面来继续完善。
二、版本二:完善MvcHandler和UrlRoutingModule这个版本,UrlRoutingModule我们还是沿用的System.Web.Routing里面的机制,我们主要来看看MvcHandler这部分的实现。
1、UrlRoutingModule的完善UrlRoutingModule.cs的完整代码如下:
using System; using System.Collections.Generic; using System.Linq; using System.Text; using System.Threading.Tasks; using System.Web; using System.Web.Routing; namespace Swift.MVC { public class UrlRoutingModule : IHttpModule { #region Property private RouteCollection _routeCollection; [System.Diagnostics.CodeAnalysis.SuppressMessage(, , Justification = )] public RouteCollection RouteCollection { get { if (_routeCollection == null) { _routeCollection = RouteTable.Routes; } return _routeCollection; } set { _routeCollection = value; } } Dispose() { //throw new NotImplementedException(); } public void Init(HttpApplication app) { app.PostResolveRequestCache += app_PostResolveRequestCache; } void app_PostResolveRequestCache(object sender, EventArgs e) { var app = (HttpApplication)sender; contextbase = new HttpContextWrapper(app.Context); PostResolveRequestCache(contextbase); } PostResolveRequestCache(HttpContextBase context) { //1.传入当前上下文对象,得到与当前请求匹配的RouteData对象 RouteData routeData = this.RouteCollection.GetRouteData(context); if (routeData == null) { return; } //2.从RouteData对象里面得到当前的RouteHandler对象。 IRouteHandler routeHandler = routeData.RouteHandler; if (routeHandler == null) { return; } //3.根据HttpContext和RouteData得到RequestContext对象 RequestContext requestContext = new RequestContext(context, routeData); context.Request.RequestContext = requestContext; //4.根据RequestContext对象得到处理当前请求的HttpHandler(MvcHandler)。 IHttpHandler httpHandler = routeHandler.GetHttpHandler(requestContext); if (httpHandler == null) { return; } //5.请求转到HttpHandler进行处理(进入到ProcessRequest方法)。这一步很重要,由这一步开始,请求才由UrlRoutingModule转到了MvcHandler里面 context.RemapHandler(httpHandler); } } }
上述代码基本都是从Framework源码里面拷贝出来的,注释中的0、1、2、3、4、5分别对应着MVC路由过程中的各个步骤,详见上篇。
这里我们自定义了一个实现IRouteHandler的类型,用来返回处理请求的HttpHandler是哪个,比如这里我们定义的MvcRouteHandler返回的HttpHandler是MvcHandler。它的代码如下:
 相关文章
相关文章

 精彩导读
精彩导读 热门资讯
热门资讯 关注我们
关注我们
