摘要:本文作者介绍了结合的WebRTC与TensorFlow实现图像检测的具体过程,不论对于TensorFlow的使用者,还是的WebRTC的开发者来讲都有参考意义由于文章较长,我们将分为上下篇进行连载。
TensorFlow是目前最流行的机器学习框架之一。TensorFlow的一大优势是,它的很多库都有人积极进行维护和更新。而我最喜欢的其中一个库就是TensorFlow 对象检测API .Tensorflow对象检测API可以对一张图形上的多个对象进行分类,并提供它们的具体位置。该API在将近1000个对象类上进行了预先训练,可提供各种经过预先训练的模型,让你可以在速度与准确性之间权衡取舍。
有这些模型的指引固然很好,但所有这些模型都要使用图像才能发挥作用,而这些图像则需要你自行添加到一个文件夹中。我其实很想将其与实时的的WebRTC流配合到一起,通过网络实现实时的计算机视觉。由于未能找到这方面的任何例子或指南,我决定写这篇博文来介绍具体的实现方法。对于使用RTC的人,可以将本文作为一篇快速指南加以参考,了解如何使用TensorFlow来处理的WebRTC流。对于使用TensorFlow的人士,则可以将本文作为一份快速简介,了解如何向自己的项目中添加的WebRTC。使用的WebRTC的人需要对Python的比较熟悉。而使用TensorFlow的人则需要熟悉网络交互和一些JavaScript的。
本文不适合作为WebRTC或TensorFlow的入门指南使用。如需这样的指南,应参考TensorFlow 入门指南,WebRTC 入门指南等,网上的相关介绍与指南数不胜数。
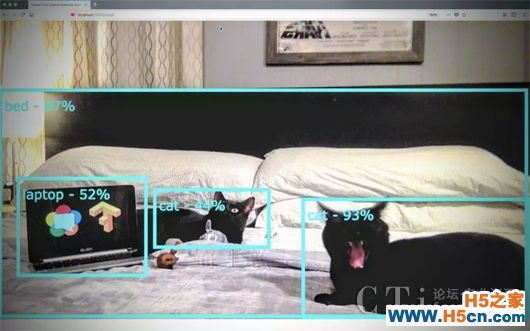
利用Tensor Flow和WebRTC检测猫咪
直接告诉我如何实现吧
如果你来这里只是为了快速找到一些参考信息,或者懒得读详细的文字介绍,按照下面的方法即可快速着手。首先安装Docker 。加载一个命令提示窗口,接着键入下面的命令:
然后在浏览器地址栏中键入并转到http:// localhost:5000 / local ,接受摄像头权限请求,你应该会看到类似下面的界面:
基本架构
我们首先建立一个基本架构,用于在本地将一个本地网络摄像头流从WebRTC的getUserMedia 发送到一个Python服务器,这要用到Flask 网络服务器和TensorFlow对象检测API(Object Detection API)。具体的设置大致如下图所示。

为搭配使用的WebRTC与TensorFlow对象检测API而建立的基本架构
Flask将提供html和JavaScript文件供浏览器呈现。getUserMedia.js负责抓取本地视频流。接下来,objDetect.js将使用HTTP POST 方法向TensorFlow对象检测API发送图像,该API则返回它所有看到的对象(它称之为“类”)及对象在图像中的位置。我们会将这些详细信息封装到一个JSON对象中,然后将该对象发回给objDetect.js,这样我们就能将我们所看到的对象的方框和标签显示出来。
配置
设置和前提条件
在开始之前,我们需要先对Tensorflow和对象检测API进行一些设置。
使用泊坞轻松完成设置
我在OSX,Windows 10和Raspbian已经设置过好几次(过程可不简单)。各种版本依赖关系错综复杂,把这些关系理顺并非易事,特别是当你只是想看看一些前期工作是否行得通时,你可能会感到气馁。我推荐使用泊坞来避免这些棘手问题。你将需要学习泊坞,这也是非学不可的东西,与其试着构建合适的的Protobuf 版本,倒不如花些时间学习它来得更为高效。TensorFlow项目维护了一些官方的Docker映像,比如tensorflow / tensorflow 。
如果你使用泊坞窗,我们就可以使用我为这篇博文创建的映像在命令行中,请运行以下命令:
请注意,在Windows 10命令行中,请使用%cd%。
。看到这里,你应该已经进入了码头工人容器现在,请运行:
这样,就会使用最新的TensorFlow Docker映像,并将Docker主机上的端口5000连接到端口5000,将容器命名为tf-webrtchacks,将一个本地目录映射到容器中的一个新/ code目录,将该目录设为默认目录(我们接下来将在该目录中操作),然后运行的bash以便进行命令行交互。完成这些准备工作后,我们才能开始。
如果你才刚开始接触TensorFlow,可能需要先按照吨ensorflow / tensorflow 中的说明运行初始Jupyter笔记本,然后再回来执行上述命令。
另一种麻烦的实现方法
如果你打算从头开始,则需要安装TensorFlow,它自己有很多依赖项,比如Python.TensorFlow项目针对各种平台都提供了指南,具体请访问https://www.tensorflow.org/install 。对象检测API有也。自己的安装说明,以及一些额外的依赖项完成这些准备工作后,请运行下面的命令:
这样,就应该安装好了所有的Python的依赖项,将相应的Tensorflow对象检测API文件都复制了过来,并安装了Protobufs。如果这一步行不通,我建议检查setup.py,然后手动在其中运行命令,以解决存在的任何问题。
第1部分 - 确保Tensorflow正常工作
为确保TensorFlow对象检测API正常工作,我们首先从用于演示对象检测的官方版本JupyterNotebook经调整后的版本着手。我将此文件保存为object_detection_tutorial.py 。
如果你剪切并粘贴该笔记本的每个部分,得到的结果应如下所示:(由于此段代码较长,截图会影响阅读,我们更换为文字排版,左右拖动可查看长代码)
# IMPORTS
import numpy as np
import os
import six.moves.urllib as urllib
import sys
import tarfile
import tensorflow as tf
import zipfile
from collections import defaultdict
from io import StringIO
# from matplotlib import pyplot as plt ### CWH
from PIL import Image
if tf.__version__ != '1.4.0':
raise ImportError('Please upgrade your tensorflow installation to v1.4.0!')
# ENV SETUP ### CWH: remove matplot display and manually add paths to references
'''
# This is needed to display the images.
%matplotlib inline
# This is needed since the notebook is stored in the object_detection folder.
sys.path.append("")
'''
# Object detection imports
from object_detection.utils import label_map_util ### CWH: Add object_detection path
#from object_detection.utils import visualization_utils as vis_util ### CWH: used for visualization
# Model Preparation
# What model to download.
MODEL_NAME = 'ssd_mobilenet_v1_coco_2017_11_17'
MODEL_FILE = MODEL_NAME + '.tar.gz'
DOWNLOAD_BASE = ''
# Path to frozen detection graph. This is the actual model that is used for the object detection.
PATH_TO_CKPT = MODEL_NAME + '/frozen_inference_graph.pb'
# List of the strings that is used to add correct label for each box.
PATH_TO_LABELS = os.path.join('object_detection/data', 'mscoco_label_map.pbtxt') ### CWH: Add object_detection path
NUM_CLASSES = 90
# Download Model
opener = urllib.request.URLopener()
opener.retrieve(DOWNLOAD_BASE + MODEL_FILE, MODEL_FILE)
tar_file = tarfile.open(MODEL_FILE)
for file in tar_file.getmembers():
file_name = os.path.basename(file.name)
if 'frozen_inference_graph.pb' in file_name:
tar_file.extract(file, os.getcwd())
# Load a (frozen) Tensorflow model into memory.
detection_graph = tf.Graph()
with detection_graph.as_default():
od_graph_def = tf.GraphDef()
with tf.gfile.GFile(PATH_TO_CKPT, 'rb') as fid:
serialized_graph = fid.read()
od_graph_def.ParseFromString(serialized_graph)
tf.import_graph_def(od_graph_def, name='')
# Loading label map
label_map = label_map_util.load_labelmap(PATH_TO_LABELS)
categories = label_map_util.convert_label_map_to_categories(label_map, max_num_classes=NUM_CLASSES, use_display_name=True)
category_index = label_map_util.create_category_index(categories)
# Helper code
def load_image_into_numpy_array(image):
(im_width, im_height) = image.size
return np.array(image.getdata()).reshape(
(im_height, im_width, 3)).astype(np.uint8)
# Detection
# For the sake of simplicity we will use only 2 images:
# image1.jpg
# image2.jpg
# If you want to test the code with your images, just add path to the images to the TEST_IMAGE_PATHS.
PATH_TO_TEST_IMAGES_DIR = 'object_detection/test_images' #cwh
TEST_IMAGE_PATHS = [ os.path.join(PATH_TO_TEST_IMAGES_DIR, 'image{}.jpg'.format(i)) for i in range(1, 3) ]
# Size, in inches, of the output images.
IMAGE_SIZE = (12, 8)
with detection_graph.as_default():
with tf.Session(graph=detection_graph) as sess:
# Definite input and output Tensors for detection_graph
image_tensor = detection_graph.get_tensor_by_name('image_tensor:0')
# Each box represents a part of the image where a particular object was detected.
detection_boxes = detection_graph.get_tensor_by_name('detection_boxes:0')
# Each score represent how level of confidence for each of the objects.
# Score is shown on the result image, together with the class label.
detection_scores = detection_graph.get_tensor_by_name('detection_scores:0')
detection_classes = detection_graph.get_tensor_by_name('detection_classes:0')
num_detections = detection_graph.get_tensor_by_name('num_detections:0')
for image_path in TEST_IMAGE_PATHS:
image = Image.open(image_path)
# the array based representation of the image will be used later in order to prepare the
# result image with boxes and labels on it.
image_np = load_image_into_numpy_array(image)
# Expand dimensions since the model expects images to have shape: [1, None, None, 3]
image_np_expanded = np.expand_dims(image_np, axis=0)
# Actual detection.
(boxes, scores, classes, num) = sess.run(
[detection_boxes, detection_scores, detection_classes, num_detections],
feed_dict={image_tensor: image_np_expanded})
### CWH: below is used for visualizing with Matplot
'''
# Visualization of the results of a detection.
vis_util.visualize_boxes_and_labels_on_image_array(
image_np,
np.squeeze(boxes),
np.squeeze(classes).astype(np.int32),
np.squeeze(scores),
category_index,
use_normalized_coordinates=True,
line_thickness=8)
plt.figure(figsize=IMAGE_SIZE)
plt.imshow(image_np)
'''
在这里我就不再赘述实际TensorFlow代码的作用了,这方面的信息可在Jupyter _ECSHOP演示及其他教程中找到。我将重点介绍我们对代码所做的修改。
我注释了几个小节:
更改了一些位置引用
删除了对Python matplot的所有引用。Python matplot用于在GUI环境中以可视化方式呈现输出结果。在我的Docker环境中没有设置它 - 根据你采用的具体运行方式,可以酌情决定是否保留这些引用。
对象检测API的输出结果
正如第111行所示,对象检测API输出4种对象:
类,分值和方框都是相互并列,大小相等的数组,因此类[N]与分数[N]和盒[n]的都是一一对应的。
由于我删去了可视化功能,我们需要通过某种方式来查看结果,所以我们要把下面的命令添加到文件末尾:
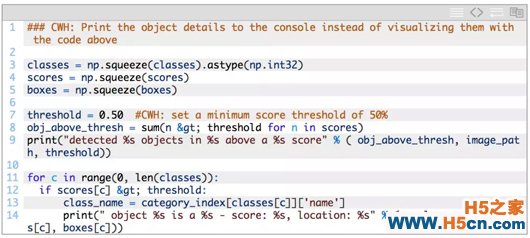
第一个np.squeeze部分只是将多维数组输出缩减成一维,这与原来的可视化代码一样。我认为这是TensorFlow的一个副产品,因为它通常会输出多维数组。
 相关文章
相关文章
 精彩导读
精彩导读
 热门资讯
热门资讯 关注我们
关注我们
