CanvasбЇЯАд§МЧ(АЫ)-бљЪН
1ЁЂЩшжУбеЩЋ
fillStyle = color; //ЩшжУЬюГфбеЩЋ
strokeStyle = color; //ЩшжУБпПђбеЩЋ
colorПЩвдЪЧБэЪО CSS беЩЋжЕЕФзжЗћДЎЃЌНЅБфЖдЯѓЛђепЭМАИЖдЯѓЁЃФЌШЯЮЊКкЩЋЃЈ#000000ЃЉЁЃ
// етаЉ fillStyle ЕФжЕОљЮЊ 'КьЩЋ' ctx.fillStyle = "red"; ctx.fillStyle = "#FF0000"; ctx.fillStyle = "rgb(255,0,0)"; ctx.fillStyle = "rgba(255,0,0,1)";
2ЁЂЭИУїЖШ
етИіЪєадгАЯьЕН canvas РяЫљгаЭМаЮЕФЭИУїЖШЃЌгааЇЕФжЕЗЖЮЇЪЧ 0.0 ЃЈЭъШЋЭИУїЃЉЕН 1.0ЃЈЭъШЋВЛЭИУїЃЉЃЌФЌШЯЪЧ 1.0ЁЃ
зЂЃК ДЫЗНЗЈЪЪгУгкашвЊЛцжЦДѓСПгЕгаЯрЭЌЭИУїЖШЕФЭМаЮЪБКђЁЃШчЙћжЛЛцжЦЩйЪ§ЭМаЮЃЌЪЙгУrgba()ЗНЗЈИќКЯЪЪЁЃrgba()ЗНЗЈЕФзюКѓвЛИіВЮЪ§БэЪОЭИУїЖШЃЌгааЇЗЖЮЇЭЌЩЯЁЃ
ДњТыЪОР§ЃК
<!DOCTYPE html PUBLIC "-//W3C//DTD XHTML 1.0 Transitional//EN" "http://www.w3.org/TR/xhtml1/DTD/xhtml1-transitional.dtd">
<html xmlns="http://www.w3.org/1999/xhtml">
<head>
<style type="text/css">
.wraper {
position: relative;
float: left;
margin-left: 10px;
margin-top: 10px;
border: 1px solid orange;
}
</style>
<script type="text/javascript">
function draw(){
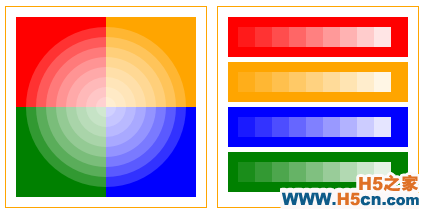
//ЩшжУбеЩЋЁЂЭИУїЖШЃЈЪЕР§вЛЃЉЪЙгУСЫglobalAlpha
var canvas1 = document.getElementById('test1');
if(canvas1.getContext){
var context = canvas1.getContext('2d');
context.fillStyle = 'red';
context.fillRect(10,10,90,90);
context.fillStyle = 'orange';
context.fillRect(100,10,90,90);
context.fillStyle = 'blue';
context.fillRect(100,100,90,90);
context.fillStyle = 'green';
context.fillRect(10,100,90,90);
context.fillStyle = '#FFFFFF';
context.globalAlpha = 0.2;
for(var i = 0; i < 8; i++){
context.beginPath();
context.arc(100,100,10+i*10,0,Math.PI*2,true);
context.fill();
}
}
//ЩшжУбеЩЋЁЂЭИУїЖШЃЈЪЕР§ЖўЃЉЪЙгУСЫrgba()
var can2 = document.getElementById('test2');
if(can2.getContext){
var cxt2 = can2.getContext('2d');
cxt2.fillStyle = 'red';
cxt2.fillRect(10,10,180,40);
cxt2.fillStyle = 'orange';
cxt2.fillRect(10,55,180,40);
cxt2.fillStyle = 'blue';
cxt2.fillRect(10,100,180,40);
cxt2.fillStyle = 'green';
cxt2.fillRect(10,145,180,40);
for(var i = 0; i < 4; i++){
for(var j = 0; j < 9; j++){
cxt2.fillStyle = 'rgba(255,255,255,'+ (j+1)*0.1+')';
cxt2.fillRect(20+j*17,20+i*45,17,20);
}
}
}
}
</script>
</head>
<body onload="draw();">
<canvas id="test1" width="200px" height="200px" class="wraper"></canvas>
<canvas id="test2" width="200px" height="200px" class="wraper"></canvas>
</body>
</html>
ЯдЪОаЇЙћЃК
3ЁЂЯпаЭ
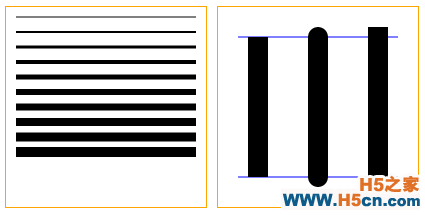
lineWidth = value; //ЩшжУЕБЧАЯпЬѕЕФДжЯИЁЃБиаыЮЊе§жЕЁЃФЌШЯЮЊ1.0ЁЃ
lineCap = type; //ЩшжУЯпЬѕЖЯЕуЕФбљзгЁЃbuttЁЂroundЁЂsquareЁЃФЌШЯЮЊbuttЁЃ
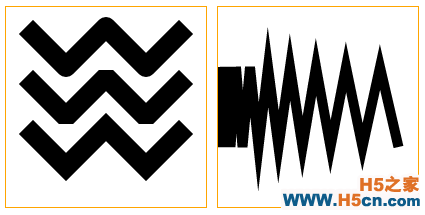
lineJoin = type; //ЩшжУЯпЬѕСЌНгЪБЕФбљзгЁЃroundЁЂbevelЁЂmiterЁЃФЌШЯЮЊmiterЁЃ
miterLimit = value; //ЩшжУЯпЬѕСЌНгЪБЭтбгНЛЕуКЭСЌНгЕуЕФзюДѓОрРыЁЃ
ДњТыЪЕР§ЃК
<!DOCTYPE html PUBLIC "-//W3C//DTD XHTML 1.0 Transitional//EN" "http://www.w3.org/TR/xhtml1/DTD/xhtml1-transitional.dtd">
<html xmlns="http://www.w3.org/1999/xhtml">
<head>
<style type="text/css">
.wraper {
position: relative;
float: left;
margin-left: 10px;
margin-top: 10px;
border: 1px solid orange;
}
</style>
<script type="text/javascript">
function draw(){
//ЯпЬѕПэЖШ
var can3 = document.getElementById('test3');
if(can3.getContext){
var cxt3 = can3.getContext('2d');
for(var i = 0; i < 10; i++){
cxt3.beginPath();
cxt3.lineWidth = i+1;
cxt3.moveTo(10,10+15*i);
cxt3.lineTo(190,10+15*i);
cxt3.stroke();
}
}
//ЯпЬѕЖЫЕубљЪН
var capArray = ['butt','round','square'];
var can4 = document.getElementById('test4');
if(can4.getContext){
var cxt4 = can4.getContext('2d');
cxt4.strokeStyle = 'rgba(0,0,255,1)';
cxt4.beginPath();
cxt4.moveTo(20,30);
cxt4.lineTo(180,30);
cxt4.moveTo(20,170);
cxt4.lineTo(180,170);
cxt4.stroke();
cxt4.strokeStyle = 'rgba(0,0,0,1)';
cxt4.lineWidth = 20;
for(var i = 0; i < 3; i++){
cxt4.lineCap = capArray[i];
cxt4.beginPath();
cxt4.moveTo(40+i*60,30);
cxt4.lineTo(40+i*60,170);
cxt4.stroke();
}
}
//ЯпЬѕСЌНгбљЪН
var joinArray = ['round','bevel','miter'];
var can5 = document.getElementById('test5');
if(can5.getContext){
var cxt5 = can5.getContext('2d');
cxt5.lineWidth = 20;
for(var i = 0; i < 3; i++){
cxt5.lineJoin = joinArray[i];
cxt5.beginPath();
cxt5.moveTo(20,20+i*50);
cxt5.lineTo(60,60+i*50);
cxt5.lineTo(100,20+i*50);
cxt5.lineTo(140,60+i*50);
cxt5.lineTo(180,20+i*50);
cxt5.stroke();
}
}
//miterLimitбљЪН
var can6 = document.getElementById('test6');
if(can6.getContext){
var cxt6 = can6.getContext('2d');
cxt6.miterLimit = 10;
cxt6.lineWidth = 10;
cxt6.moveTo(0,100);
for(var i = 0; i < 20; i++){
var y = i%2 ? 140 : 60;
cxt6.lineTo(Math.pow(i,2)*0.5,y);
}
cxt6.stroke();
}
}
</script>
</head>
<body onload="draw();">
<canvas id="test3" width="200px" height="200px" class="wraper"></canvas>
<canvas id="test4" width="200px" height="200px" class="wraper"></canvas>
<canvas id="test5" width="200px" height="200px" class="wraper"></canvas>
<canvas id="test6" width="200px" height="200px" class="wraper"></canvas>
</body>
</html>
ЯдЪОЕФаЇЙћ
ЁЁ
 ЯрЙиЮФеТ
 ОЋВЪЕМЖС
 ШШУХзЪбЖ
 ЙизЂЮвУЧ
