Along with this project, I devised a sample interface service, and you can use it to familiarize how to play with ApiTestEngine .
This sample service mainly has two parts:
As you see, it is very similar to the mainstream production systems. Therefore once you are familiar with handling this demo service, you can master most test scenarios in your project.
Launch Sample Interface ServiceThe demo service is a flask server, we can launch it in this way.
$ export FLASK_APP=tests/api_server.py $ flask run * Serving Flask app "tests.api_server" * Running on :5000/ (Press CTRL+C to quit)Now the sample interface service is running, and we can move on to the next step.
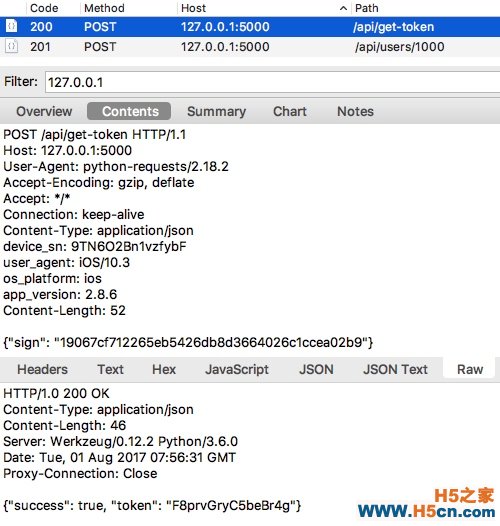
Capture HTTP request and responseBefore we write testcases, we should know the details of the API. It is a good choice to use a web debugging proxy tool like Charles Proxy to capture the HTTP traffic.
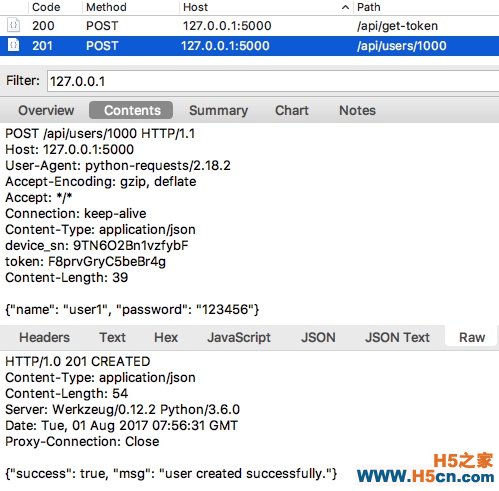
For example, the image below illustrates getting token from the sample service first, and then creating one user successfully.
After thorough understanding of the APIs, we can now begin to write testcases.
Write the first test caseOpen your favorite text editor and you can write test cases like this.
- test: name: get token request: url: :5000/api/get-token method: POST headers: user_agent: iOS/10.3 device_sn: 9TN6O2Bn1vzfybF os_platform: ios app_version: 2.8.6 json: sign: 19067cf712265eb5426db8d3664026c1ccea02b9 - test: name: create user which does not exist request: url: :5000/api/users/1000 method: POST headers: device_sn: 9TN6O2Bn1vzfybF token: F8prvGryC5beBr4g json: name: "user1" password: "123456" validators: - {"check": "status_code", "comparator": "eq", "expected": 201} - {"check": "content.success", "comparator": "eq", "expected": true}As you see, each API request is described in a test block. And in the request field, it describes the detail of HTTP request, includes url, method, headers and data, which are in line with the captured traffic.
You may wonder why we use the json field other than data . That’s because the post data is in JSON format, when we use json to indicate the post data, we do not have to specify Content-Type to be application/json in request headers or dump data before request.
Have you recalled some familiar scenes?
Yes! That’s what we did in requests.request ! Since ApiTestEngine takes full reuse of Requests , it inherits all powerful features of Requests , and we can handle HTTP request as the way we do before.
Run test casesSuppose the test case file is named as quickstart-demo-rev-0.yml and is located in examples folder, then we can run it in this way.
ate examples/demo-rev-0.yml Running tests... ---------------------------------------------------------------------- get token ... INFO:root: Start to POST :5000/api/get-token INFO:root: status_code: 200, response_time: 48 ms, response_length: 46 bytes OK (0.049669)s create user which does not exist ... INFO:root: Start to POST :5000/api/users/1000 ERROR:root: Failed to POST :5000/api/users/1000! exception msg: 403 Client Error: FORBIDDEN for url: :5000/api/users/1000 ERROR (0.006471)s ---------------------------------------------------------------------- Ran 2 tests in 0.056s FAILED (Errors=1)Oops! The second test case failed with 403 status code.
That is because we request with the same data as we captured in Charles Proxy , while the token is generated dynamically, thus the recorded data can not be be used twice directly.
Optimize test case: correlationTo fix this problem, we should correlate token field in the second API test case, which is also called correlation .
- test: name: get token request: url: :5000/api/get-token method: POST headers: user_agent: iOS/10.3 device_sn: 9TN6O2Bn1vzfybF os_platform: ios app_version: 2.8.6 json: sign: 19067cf712265eb5426db8d3664026c1ccea02b9 extract_binds: - token: content.token validators: - {"check": "status_code", "comparator": "eq", "expected": 200} - {"check": "content.token", "comparator": "len_eq", "expected": 16} - test: name: create user which does not exist request: url: :5000/api/users/1000 method: POST headers: device_sn: 9TN6O2Bn1vzfybF token: $token json: name: "user1" password: "123456" validators: - {"check": "status_code", "comparator": "eq", "expected": 201} - {"check": "content.success", "comparator": "eq", "expected": true}As you see, the token field is no longer hardcoded, instead it is extracted from the first API request with extract_binds mechanism. In the meanwhile, it is assigned to token variable, which can be referenced by the subsequent API requests.
Now we save the test cases to quickstart-demo-rev-1.yml and rerun it, and we will find that both API requests to be successful.
Optimize test case: parameterizationLet’s look back to our test set quickstart-demo-rev-1.yml , and we can see the device_sn field is still hardcoded. This may be quite different from the actual scenarios.
 相关文章
相关文章 精彩导读
精彩导读
 热门资讯
热门资讯 关注我们
关注我们
