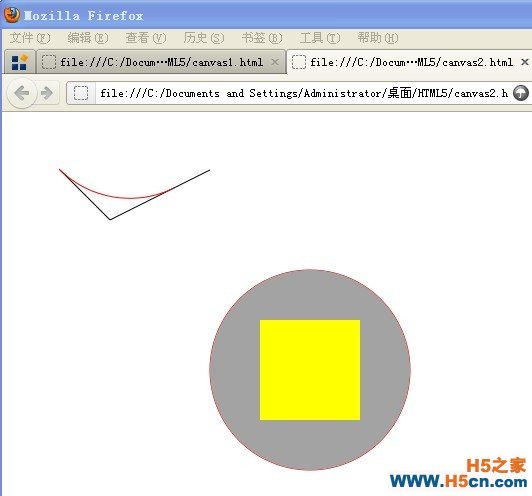
实例代码:
<!DOCTYPE HTML> <html> <body> <canvas id="canvas" width="600"height="400"> <p>Your browserdoes not support the canvas element!</p> </canvas> <script type="text/javascript"> window.onload = function() { var canvas =document.getElementById("canvas"); var context2D =canvas.getContext("2d"); //绘制相交的线段 context2D.beginPath(); context2D.moveTo(50,50); //指定一条线段的起点 context2D.lineTo(100,100); //指定一条线段的终点 context2D.moveTo(200,50); context2D.lineTo(100,100); context2D.stroke(); //绘制与这两条线段相切的红色圆弧 context2D.beginPath(); //清除之前的路径并提醒Context开始绘制一条新的路径,否则当调用stroke()方法的时候会绘制之前所有的路径 context2D.strokeStyle= "#ff0000"; context2D.moveTo(50,50); context2D.arcTo(100,100, 200, 50, 100); //很明显,这里的参数不好设置…… context2D.stroke(); //绘制一个蓝色的圆 context2D.beginPath(); context2D.strokeStyle= "#ff0000"; context2D.arc(300,250, 100, 0, Math.PI*2 , false); //注意这里的参数是弧度制,而不是角度制 context2D.stroke(); //将上面的圆填充为灰色 context2D.fillStyle ="#a3a3a3"; context2D.fill(); //在上面的圆中剪辑一个圆形方形区域 context2D.beginPath(); context2D.rect(250,200, 100, 100); context2D.clip(); //这个方法确实很土,需要借助于默认的矩形或者制定的矩形,而不能自定义矩形 //在剪辑区域中填充一个大于该区域尺寸的矩形 context2D.fillStyle ="yellow"; context2D.fillRect(0,0, 400, 400); } </script> </body> </html>
效果如下:

画布背景
在上面的例子中,调用了fillRect()方法。实际上,Context对象拥有3个方法可以直接在画布上绘制图形而不需要路径,可以将其视为直接在画布背景中绘制。这3个方法的原型如下:
void fillRect(left, top,width, height);
用于使用当前的fillStyle(默认为”#000000”,黑色)样式填充一个左上角顶点在(left, top)点、宽为width、高为height的矩形。
void strokeRect(left, top,width, height);
用于使用当前的线条风格绘制一个左上角顶点在(left, top)点、宽为width、高为height的矩形边框。
void clearRect(left, top,width, height);
用于清除左上角顶点在(left,top)点、宽为width、高为height的矩形区域内的所有内容。
图片
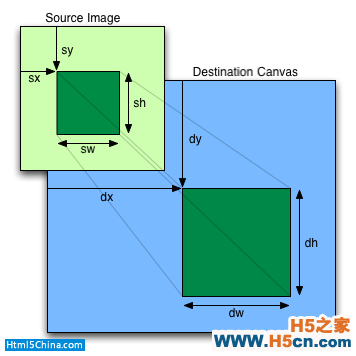
Context对象中拥有drawImage()方法可以将外部图片绘制到Canvas中。drawImage()方法的3种原型如下:
drawImage(image, dx, dy);
drawImage(image, dx, dy,dw, dh);
drawImage(image, sx, sy,sw, sh, dx, dy, dw, dh);
下图展示了原型中各参数的含义:

其中,image参数可以是HTMLImageElement、HTMLCanvasElement或者HTMLVideoElement。第三个方法原型中的sx、sy在前两个中均为0,sw、sh均为image本身的宽和高;第二和第三个原型中的dw、dh在第一个中也均为image本身的宽和高。
如下的示例将一张远程图片绘制到了画布中:
<!DOCTYPE HTML> <html> <body> <canvas id="canvas" width="600"height="400"> <p>Your browserdoes not support the canvas element!</p> </canvas> <script type="text/javascript"> window.onload = function() { var canvas =document.getElementById("canvas"); var context2D =canvas.getContext("2d"); var pic = new Image(); pic.onload=function(){ context2D.drawImage(pic,0, 0); } pic.src =""; } </script> </body> </html>
效果如下:

你如果有兴趣,可以把以上代码改为这样:
<canvas id="canvas" width="600"height="400"> <p>Your browserdoes not support the canvas element!</p> </canvas> <script type="text/javascript"> window.onload = function() { var canvas =document.getElementById("canvas"); var context2D =canvas.getContext("2d"); var pic = new Image(); pic.src =""; context2D.drawImage(pic,0, 0); } </script>
然后总结两种方式为什么会出现差异。
本文主要参考,另外加入了一些自己的看法。
 相关文章
相关文章
 精彩导读
精彩导读 热门资讯
热门资讯 关注我们
关注我们
